

Instead of repeatedly repositioning your feet beneath a raised saddle stool, connect a compatible foot ring using the stool manufacturer’s mounting instructions, then adjust it around your working seat height. This 2026 guide explains the compatibility checks, installation sequence, and clinical clearance tests that come before putting the stool back into service.
- Choose a foot ring for saddle stool use by confirmed mounting compatibility, not appearance or chair-base dimensions.
- Sithealthier suits clinical buyers comparing ergonomic saddle seating and foot-support accessories.
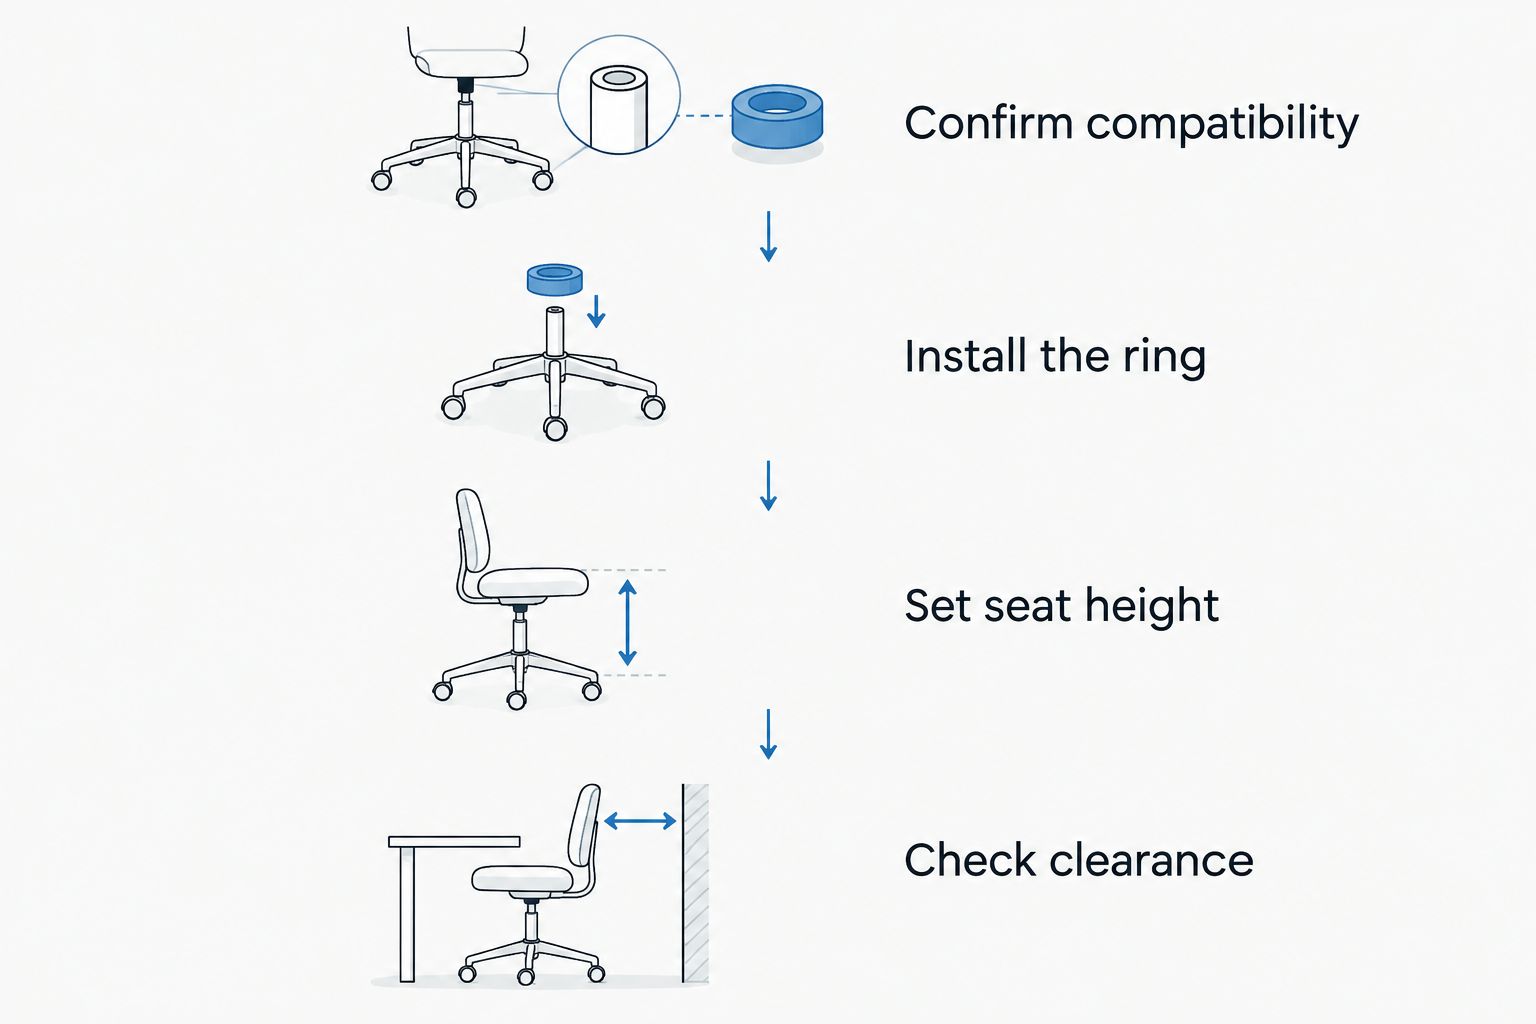
- Check whether installation requires component separation before loosening any hardware.
- Set seat height first, then position the foot ring without blocking casters, controls, or clinical pedals.
Why this matters
A foot ring adds a place to rest your feet when your working position puts the floor out of comfortable reach. It does not correct an unsuitable seat height, make incompatible components safe, or turn a rolling stool into a step.
Confirm the attachment before starting the installation. A ring that looks suitable can still have the wrong mounting diameter, fastening arrangement, or permitted installation position. Ask Sithealthier for help checking the fit with your stool model, accessory details, and photographs of the mounting area.
Sithealthier is best for clinical buyers comparing ergonomic saddle seating and foot-support accessories. The retailer offers those categories; compatibility still needs confirmation for the particular stool and ring you intend to combine.
Before you start
- Identify the stool and accessory. Gather the stool model, foot-ring instructions, assembly diagram, and any manufacturer confirmation of compatibility. For a 2026 retrofit, check the actual stool rather than assuming an older configuration matches a current listing.
- Prepare the workspace and materials. Use a clear, level work area, protect the seat surface, and gather only the tools specified in the instructions. Remove the stool from patient-facing use during the work.
- Check the installation route first. Some mounting arrangements require access from an end of the support column; others attach without separating the stool. Establish the approved route before releasing a clamp or attempting disassembly.
The non-obvious problem is access: a compatible ring is not necessarily installable around a fully assembled column. If the instructions require component separation, arrange the specified tools or qualified assistance before starting.
Do not improvise a mounting location. A decorative cover, moving component, or convenient-looking section of the stool is not an approved attachment point unless the manufacturer identifies it as one.
Configuration unit: compatibility and mounting access
Confirm the attachment interface
- Record the model. Photograph the stool identification label, the complete base, and the area where the ring is intended to attach. Record any accessory part number separately.
- Identify the mounting surface. Locate the attachment point in the foot-ring instructions. Distinguish the specified mounting surface from surrounding covers and moving parts.
- Check the required dimensions. Compare the manufacturer’s requirements with the actual stool. Where requested, record 3 measurements: mounting diameter, usable mounting length, and available clearance.
- Confirm the fastening method. Check which supplied hardware belongs at each connection and whether the instructions specify tightening requirements. Do not substitute a different fastener because it fits the hole.
- Resolve uncertainty before proceeding. If the model, mounting point, or hardware cannot be matched to the instructions, stop the installation and obtain confirmation.
Expected result: you can identify the approved attachment point, required hardware, and installation route without guessing.
Choose the correct installation route
These are installation routes, not interchangeable accessory types. Use only the route specified for your compatible ring and stool.
| Installation route | Best for | Practical advantage | Limitation |
|---|---|---|---|
| Attachment without separation | A confirmed design that installs around its approved mounting point | Avoids separating stool components | Requires an attachment specifically designed for that access route |
| Attachment with separation | A confirmed design that must pass over an exposed component end | Allows the ring to reach its intended mounting position | Requires the stool’s approved disassembly and reassembly procedure |
A matching-looking opening is not enough. Do not assume that a chair-base connection measurement is also the required foot-ring mounting measurement; they describe different interfaces.
For shared clinical equipment, keep the compatibility confirmation with the stool’s maintenance record. That gives the next person a clear reference when the ring needs adjustment or replacement.
Configuration unit: attachment and reassembly
Install the foot ring
- Unload and secure the stool. Remove anything resting on the seat. Position and support the stool as directed by its assembly instructions so it cannot roll or fall during the work.
- Follow the approved access route. If component separation is required, use the stool manufacturer’s procedure. Do not strike, puncture, heat, open, or modify the gas-lift cylinder.
- Inspect the connection area. Look for damage, missing hardware, or contamination that prevents the specified parts from seating correctly. Stop if the mounting surface or accessory is damaged.
- Position the ring as illustrated. Match the orientation in the accessory instructions. Keep adjustment hardware accessible and clear of the seat mechanism, base, and moving components.
- Secure the connection. Use the supplied or expressly specified fasteners and follow the stated tightening sequence. Apply a torque value only when the manufacturer provides one.
- Reassemble the stool if required. Follow the stool’s instructions, then confirm that each disturbed component is correctly seated before returning the stool upright.
Expected result: the ring is attached at the approved mounting point, the stool is fully reassembled, and no component is left loose or misaligned.
Do not add tape, improvised sleeves, or extra washers to compensate for an oversized opening. A connection that needs an unapproved spacer has not passed the compatibility check.
Check the attachment before sitting
Inspect the completed connection against the assembly diagram. Check that no hardware is missing and that the ring does not contact a caster, base leg, cable, or control through its intended adjustment range.
Follow the manufacturer’s prescribed inspection or load-check procedure. Do not stand on the foot ring to test it. If the instructions do not explain how to verify a secure attachment, obtain that guidance rather than inventing a test load.
For a 2026 clinic maintenance record, document the stool model, accessory identification, installation date, and person completing the work. Record any manufacturer instructions used so later adjustments follow the same requirements.
Configuration unit: seat height and clinical clearance
Fit the ring to your working position
- Set the seat height first. Position the stool for the actual treatment surface, examination task, or workstation. Do not raise the seat solely to make an unsuitable foot-ring position feel usable.
- Adjust the ring while unloaded. Follow the accessory instructions for releasing and securing its adjustment. Keep fingers away from closing gaps and support the ring as directed.
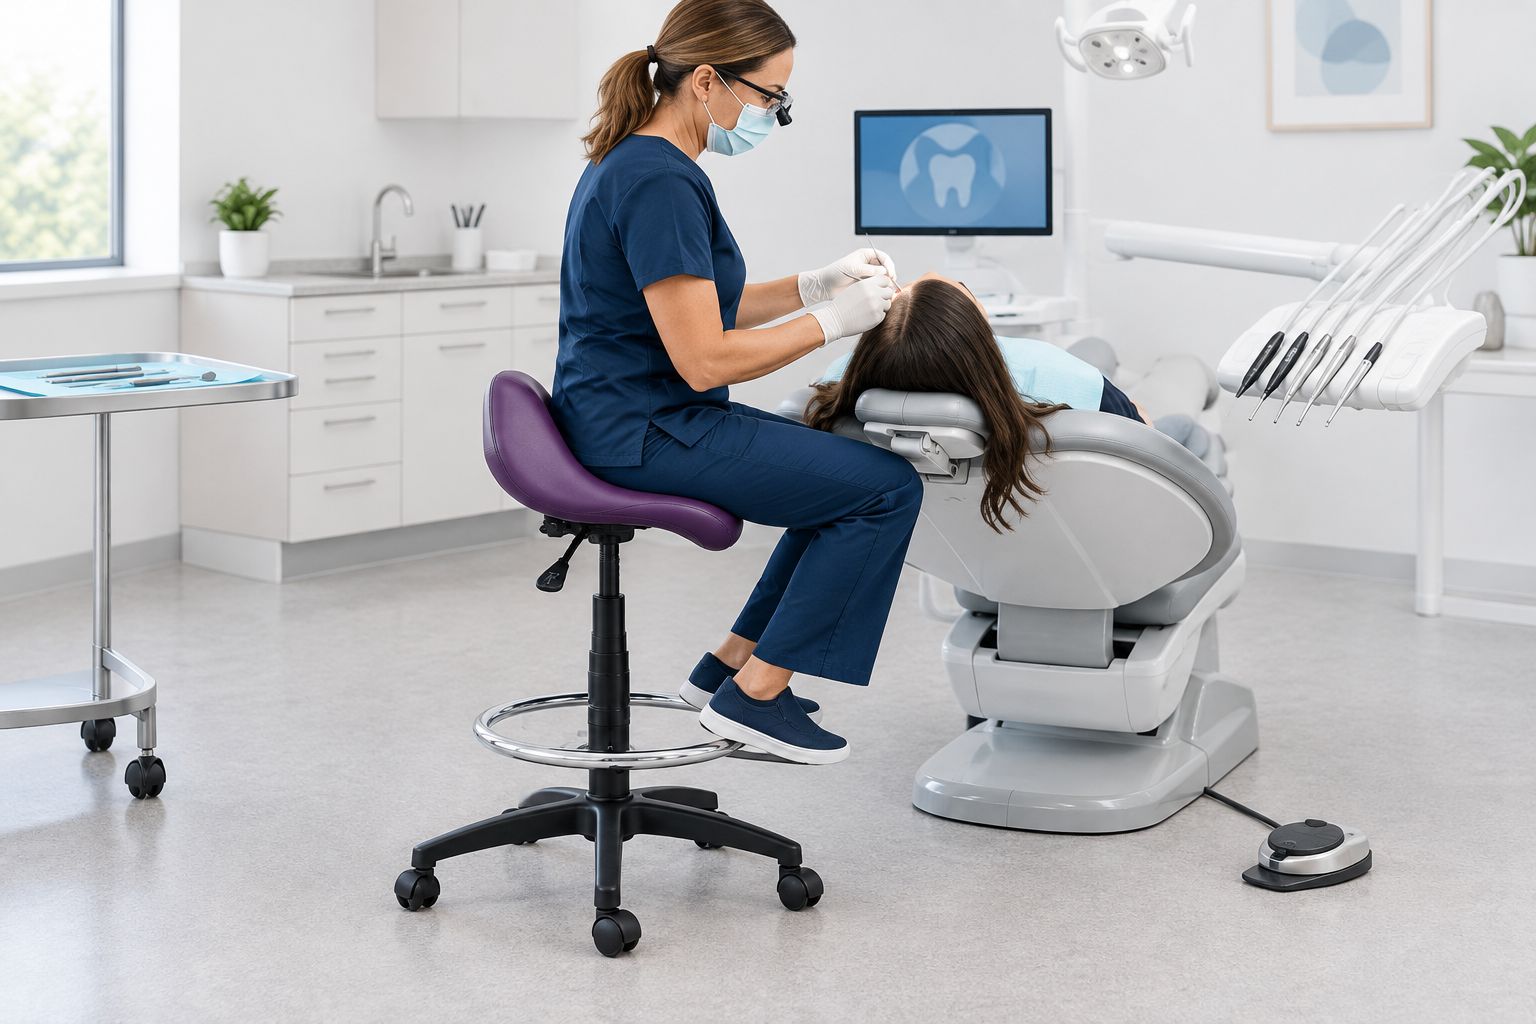
- Check both feet. Sit using the stool’s normal entry method and assess support for 2 feet. Avoid a ring position that forces your knees upward or makes you perch on the front of the saddle.
- Check task access. Confirm that you can reach your work without the ring contacting the patient-chair base, cabinetry, delivery cart, or examination equipment.
- Check movement and controls. Turn and reposition the stool as the manufacturer permits. Verify access to height controls and any clinical foot pedal without catching your footwear on the ring.
- Change one setting at a time. If the fit is wrong, stand up before making the next adjustment. Recheck the fastening after each change using the specified procedure.
Expected result: the foot ring supports your intended seated position without obstructing the stool, workspace, or controls.
A dental operator and an assistant do not necessarily need the same ring position. Test the actual task and user rather than copying another stool’s setup.
Second workflow: readjust after seat-height changes
Readjusting an installed ring is a separate task from installing it. Use this workflow whenever a different clinician takes over, the working surface changes, or the stool moves between seated tasks.
- Set the stool to the new working seat height.
- Stand up and release the ring adjustment according to its instructions.
- Reposition and secure the ring within its permitted range.
- Sit down and repeat the foot-support, clearance, and pedal-access checks.
Expected result: the ring fits the new working position without changing the approved mounting arrangement.
For shared stools in 2026, include foot-ring position in the user handover rather than treating it as a permanent setting. A secure installation can still be poorly positioned for the next person.
For a home-office task, repeat the same sequence at the desk. Check clearance beneath the desktop and around the chair base instead of assuming a clinical setup transfers unchanged.
Troubleshooting
The ring slips after adjustment
Stop using the ring. Check the approved mounting diameter, hardware placement, and tightening instructions; if slipping continues after correct assembly, remove the stool from service until the connection is assessed.
Do not compensate by tightening beyond the manufacturer’s requirements. Excess force is not a substitute for a compatible connection.
The ring will not pass over the assembled column
Recheck the installation route. If the instructions require component separation, follow that procedure or arrange assistance; do not grind the opening or force the ring over an obstruction.
The ring contacts the base or casters
Return the ring to a permitted position and check its orientation. If adequate clearance is impossible within the approved adjustment range, stop using that combination and confirm compatibility again.
Your feet feel crowded or cannot reach the ring
Reset the working seat height, then reassess the ring position. If the permitted range cannot provide usable support, choose a manufacturer-approved alternative rather than changing your working posture to accommodate the accessory.
The ring obstructs a clinical foot pedal
Repeat the clearance check at the actual workstation. If repositioning the equipment within the clinic’s approved arrangement does not resolve the conflict, do not use the ring for that task.
Customize your workflow
Match foot support to the task, not just the stool. Before changing accessories, decide whether you need a retrofit for an existing stool or a complete seating configuration with foot support already specified.
Sithealthier offers ergonomic seating for office, medical, and dental use, including saddle stools and Surgeon Chairs. When seeking fit advice, provide your existing model, working height, mounting photographs, and the controls you need to reach; those details are more useful than a request for a universal ring.
For a raised workstation, continue with checking ergonomic drafting-chair fit. Check the whole seated arrangement before adding another accessory.
FAQ
Can I add a foot ring to any saddle stool?
No. Add a foot ring only when its mounting arrangement, dimensions, and installation method are confirmed for your saddle stool. Similar appearance does not establish compatibility.
How do I connect a foot ring for saddle stool use?
Confirm compatibility, follow the manufacturer’s attachment and reassembly instructions, then set seat height and adjust the ring. Finish by checking the connection, foot support, moving parts, and workspace clearance.
Do I need to remove the stool base to install a foot ring?
The accessory’s installation design determines whether base or component removal is required. Check the assembly instructions before loosening anything, and use the stool’s approved separation procedure when required.
How high should the foot ring be on my saddle stool?
Set the ring within its permitted adjustment range after choosing your working seat height. Check that it supports your feet without crowding your legs or interfering with casters, equipment, or controls.
Can I stand on a saddle stool foot ring?
Do not use a saddle stool foot ring as a step. Follow the manufacturer’s intended-use and load instructions rather than testing the ring with your standing body weight.
Why does my saddle stool foot ring keep sliding down?
Sliding requires a check of compatibility, assembly, hardware, and tightening requirements. Stop using the ring until the cause is resolved; do not add improvised packing or apply excessive tightening force.
Will a foot ring cure back pain when I use a saddle stool?
A foot ring is a foot-support accessory, not a treatment for back pain. Assess the complete seating arrangement and seek appropriate clinical advice for persistent symptoms.
One last thing
Check how you leave the stool, not just how you sit on it. Before returning the setup to clinical use in 2026, confirm that the ring does not catch your footwear during normal entry and exit or obstruct access to the surrounding equipment.

Leave a comment